Friday, 9 April 2021

Nissan Leaf (gen-1) Old vs New Battery

[UPDATE 06-May-2022: Updating battery degradation chart]

Comparison of battery degradation (Nissan Leaf gen-1), before and after battery replacement:

Note that the top x-axis is for the new replaced battery, both plotted on the same date scale for easy comparison. My mileage usage is consistent every week, so using date scale for convenience:


The bump above, that was when I had recall from Nissan for battery software update, which I'm guessing is this one.

Now, for the difference in kWh/km reported by dash vs LeafSpy reading, comparing old vs new battery:

From my old battery below, 0.13kWh/km (dash) vs 0.18kWh/km (LeafSpyPro):


From new battery, which both has same figure at 0.12kWh/km:

However, do note new battery also suffers some difference (maybe depends on SoC?), as example below. I forgot to take photo from the dash on the day, but it was 0.13kWh/km on the dash (compared to 0.18kWh/km from LeafSpyPro):

Issue above causes the battery meter seems reporting discharge quicker, and then slows down later.


Tuesday, 29 September 2020

Nissan Leaf 2012 Fast Charge Curve

Some data from my Nissan Leaf 2012 fast-charge sessions:

Before and after battery replacement. Both data are for gen-1 battery, a.k.a canary battery:

Nissan Leaf Battery Fast Charge

Not too far from out there:


Sunday, 2 August 2020

eBike Long Term Reliability (2)

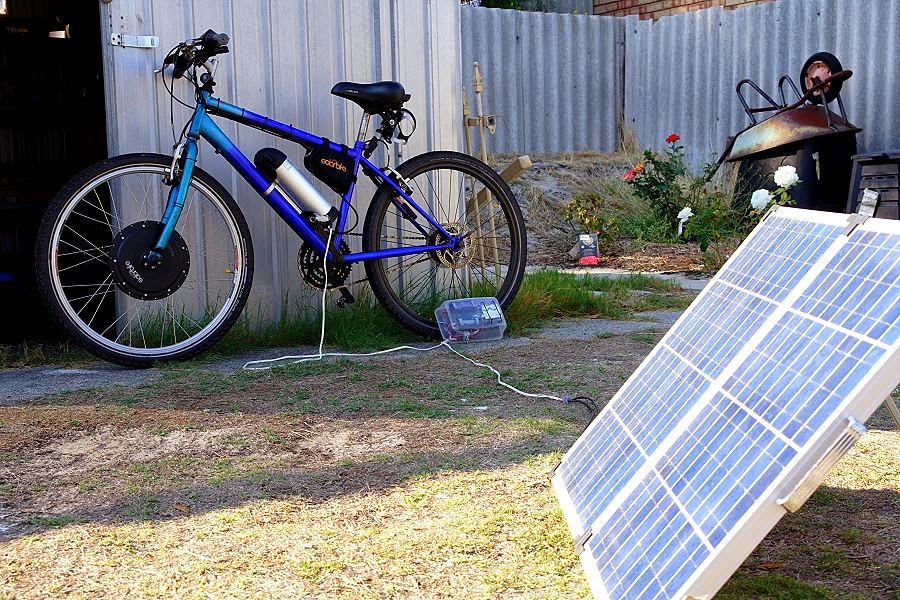
After clocking 54,000km since 2013, my DIY eBike conversion has indeed surpassed my expectation.

eBike


Photo of now and then.

Update since then:

Upgrade to a Bigger Battery:

The one on the photo above is my 3rd one (14Ah Tiger Shark Battery).

My 2nd set of battery has performed better compared to my first one by simply doing these:
  1. Fill any gaps with silicon grease. No more water ingress!
  2. Don't leave it fully charged and then leave it unused, especially on hot days.

Second bullet point above is important if you want to extend your battery life. My 2nd set of battery is now just under 9Ah capacity left (original 11.6Ah) after 1,000 deep cycles. Where as my first one degraded to just under 8Ah after same 1,000 deep cycles (see Note 1 below).

What happened to my previous batteries? Are they polluting the landfill?

Glad you ask! (of course you didn't)

They're joining my battery storage in my shed. I've upgraded my off-grid shed to include my ex-eBike batteries! Also, after getting an extra solar panel couple years ago (super cheap 2nd hand panel), my commute has been totally charged by the sun, even in winter cloudy days! Well, ok, half-lie there, as the other way charged at work, ha!

Note:
  1. 'Deep cycle' here is 7Ah average per ride after 1,000 cycles. Individual rides vary between 6 to 9Ah, which highly depends on head-wind.

Tuesday, 7 May 2019

Sin of Early Adopters

Ah, the sin of early adopters. The consequence from Nissan Leaf's engineers bad choice for their first generation EV battery, is now felt years later: The wrath of increased internal resistance (see UPDATE below)!

So far, my first-gen Leaf (i.e. 2012 built) decreased battery capacity (originally 24kWh) is not my biggest problem, thanks to network of fast chargers. The degrading internal battery resistance is!

My real issue is, instead of being able to 'fill' my battery in 6 minutes for a quick top-up of 5kWh, or roughly 30-ish km of range (so I can quickly get back on the road), the degraded battery has also 'slows' down the quick charge capability considerably. More than twice as long!

Prodding into cells' battery voltage during fast charge, revealed that the BMS deliberately slows down the charger in order to maintain cell battery voltage under 4.1 Volt at any stage. Fair enough. One can expect this 'slowing down' when the battery is closer to fully charged (i.e. 80% SoC or above). Due to massive degradation of 'Hx', this now happens very early on mine (under 50% SoC). Yikes!! (see UPDATE below)


I just never thought the 'Hx' degradation griefs me equally as the 'SoH' degradation. Sad.

Looking at the bright side (so I can feel better), other than batteries, Nissan Leaf is such a good car (said me who treat cars like a fridge, i.e. purely utilitarian). Definitely no disappointment to date (except the battery...)!

My battery history so far:


Nomenclature buster:

BMS:
Battery Management System.

SoH:
State of Health is another indication of the battery's ability to hold and release energy and is reported as a percentage. When the battery is new SOH=100%.

SoC:
State of Charge indicates the amount of charge currently in the battery.

Hx:
The meaning of this number is not fully understood but it appears to be inversely related to the battery internal resistance. As the internal resistance of the battery pack increases it is thought this percentage decreases. As internal resistance increases more energy is lost within the pack and the pack heats up more under load.

UPDATE 24 June 2019:
I had another fast charge session from 20%SoC, and I was expecting the 50kW charge lasted longer. I was wrong. After self-research, I've just found out something called polarisation effect. So, the aging of my Leaf battery grief is mostly due to this, not internal resistance.

Presented below in equivalent circuit. There you go!


Friday, 7 September 2018

Electric Bicycle Long Term Reliability


After clocking up almost 40,000km since mid-2013 (half of it clocked up in the last 2 years) in my e-Bike to commute to work, here are 2 major lessons learnt:
  1. Stop water ingress;
  2. Think about spares requirement.
Electric Bicycle

Photo: Now and then.

There is a huge exponential jump in reliability requirement when I use my eBike as a sole commuting machine. One simply can't afford a major breakdown, and there should be minimal maintenance required even with daily usage (the last thing you want to do is work on your bicycle at the end of daily commute).


Lesson#1: Waterproof Your eBike

Most bicycle components are not designed to be waterproof. These are 5 major components (from most expensive to the least) that need special attention:


Component#1: Battery

I have a tube style battery that is not designed to be water-proof (the big yellow sticker said so). However, who heed the caution tape anyway, right?

So, depending on your battery type, you need to find the gaps where water ingress is possible. On mine, it's the indicator button that tells you the battery charge remaining:


Opening the battery (voids the warranty of course), I applied (very) copious amount of silicon grease (gel type) behind every gap I can find: buttons, screws, switches, etc. To date, it's been proven very effective (true and tested in flooded road and heavy rain).

My second set of battery get silicon gel treatment, whereas my first set didn't get it. On my first set, the water ingress caused the BMS (Battery Management System) developed salt bridge and cut the output off . Luckily, after cleaning the salt bridge, it fixed the problem and continue to serve my machine until it has 70% charge remaining (after 1,000 deep cycles). It's still functioning to today, but not good enough for my commute, as I need at least 80% charge to cover strong head-wind condition (5% time of the year).

Note that I don't mention the controller in this list. Mine hasn't given me any grief whatsoever!

Lesson learnt: Silicon grease gel type is your electronics best friend.


Component#2: Electric drive hub

Considering there are so many different types of electric drives out there, I have to be specific here. I only can give you feedback on my experience with solarbike electric front-drive 500-watt kit (which looks almost identical to any other electric hub kit).

Although the electric motor is not advertised as waterproof, I'm happy to report that by simply applying light oil (I use Inox) on the shaft and cable entry time to time, it has been clocking up more than 30,000km without any issue even in flooded road.

My first front-drive electric hub motor lost its free wheeling after 10,000km. Upon opening the hub, I've found that the stator has rusted and created too much friction between the stator and the rotor. It was hard work to get the rust cleaned off due to the super strong magnet (metal scraper and magnet, hmmm...). However, after cleaning, my first set of motor is back functioning again (I keep this as a spare now).

The bearing is a sealed type on the front motor. Although the interface between the sealed bearing and the axle is a snug fit, it's still not hard to slide through, which I suspect moisture still can seep through this. The cable entry is protected by a putty, but cracks have developed after some time. These 2 factors, my guess, is where the water ingress can get through:

Electric Bicycle Hub Motor Cable Entry


Lesson learnt: light oil as corrosion inhibitor is your wheel hub best friend.


Component#3: non-electric wheel hub

Most wheel hub bearing is not water-proof, unless you have a sealed bearing type. Mine is definitely not (I've learnt this the hard way). Rusty balls anyone?

Rusty Ball Bearings


You definitely can tell when you have water ingress in your wheel hub bearing. Please don't ignore that clanging noise. Walking and dragging a bicycle with a destroyed wheel wasn't a pleasant experience (true story).

After 2 re-grease occasions in the space of 4 months (it's been a really wet 4 months), I've learnt that the best way to block water ingress is to grease them like there's no tomorrow.

Wheel Hub


From the photo above, you can see the fresh grease oozing out, where other parts are dirty. Ensure to wipe it off time to time as they get flicked off to everything else. Of course, you can get a sealed bearing type. But who can afford them?


Component #4: headset bearing

Remember the fender advice above? Depending on your headset type, water ingress on the headset bearing can cause early failure due to rust.

In mine, there is no protection whatsoever:

Lower Headset Bearing


So, I have no choice but to grease it like there's no tomorrow. I can't find an aftermarket fender that covers half circle of my front wheel.

Exacerbated with my choice in front wheel drive, my headset bearing needs replacement at least once a year. The headset bearing is definitely not designed to cope with front wheel drive.

If I've chosen rear wheel drive from the very beginning, I wouldn't have this issue. However, there are different issues in choosing rear wheel drive (more on this later).


Component#5: Chain

After trials and errors with different type of grease, light oil, etc, I've found that immersive wax is the very best for longetivity of the chain, coupled with the least number of maintenance.

The basic 'science' is not to have sand and grit trapped in the chain during wet weather riding, which becomes abrasive to your drivetrain (chain ring, the chain itself, and the rear casette). Immersive wax basically makes your chain clean at ALL times (even riding in a flooded road).

However, you still need to dry your chain (quick wipe with a dry cloth) after each wet ride. I left them wet once and ended up with surface rust on the rollers and plates:

Rusty Bicycle Chain


 I still need to re-wax my chain after cumulative 300km (really) wet ride. In the dry season, I haven't found the upper limit yet. Usually, I rewax after 600km cumulative dry ride (it can definitely go longer).

The other thing I've done to my eBike is to convert it to a single speed. This simplifies the drivetrain considerably for easy cleaning after each wet ride (you don't need gears with eBike). The conversion process itself is a big steep learning curve for me (and not trivial). Let's park that for another time.

To mention the obvious, chain quick-connect is essential.

My last chain has stretched about 1/32" out of 12" length after roughly 10,000km ride (the limit is 1/16" from here). Half of it had light oil (Inox) bath treatment, the other half had immersive wax. Mind due though, the electric assist has also contributed large part of the longetivity, i.e. the chain has been barely 'stressed' :). If you have a mid-drive electric motor, that'll be a different story!

There is another choice: simply replace drivetrain every few months or so. I didn't do any maintenance at one stage (wrong choice of lubricant was also largely responsible) and managed to get a 1/2" stretch (out of 12" length) after more than a year. Yup, the drivetrain was completely destroyed (some teeth were reduced to a blip). Sorted!

Moral of the story: Chain maintenance takes time and money (wax is not cheap). I'm seriously considering the no maintenance approach and treat them as a pure consumables (which includes the chain-ring and rear sprocket).


Lesson#2: Spare Philosophy

Getting cheap parts for your eBike build is one thing, but to keep using it for long term is another thing.

I've seen many special built eBikes entering the market in the last 2 ~ 3 years with its beautifully packaged system (and expensive of course). However, when you need to replace its parts (with components mentioned above). Will these parts available when you need them? How expensive are the replacement parts?

This is when building your own eBike shines. These days, finished products are built to Apple-like system, locking consumer to a specific manufacturer where you can't get replacement parts anywhere else (and super expensive).

On the other hand, using stock standard frame (with special attention to components I mentioned above) ensures your system can last a long time and replaced with cheap available parts when required. New 27.5" and 29-er with disc brakes are not helping one's decision, but, let's park that issue for other times.

I mentioned above that rear wheel drive eliminates the issue with headset bearing (so you don't need to replace it too often). However, from my 40,000 km commuting experience, it has always been (100% of the time) the rear wheel that experiencing punctures (don't know why).

I always have Schwalbe marathon plus with its awesome anti-puncture capability. However, that still doesn't stop steel wire debris (no thanks to industrial area where I need to go) going through the thick layer of rubber.

If I use rear wheel drive and got a puncture, that will be super difficult for me to replace on the road (no such thing as 'Quick Release' on electric motors). I haven't tried tubeless tyres though. So, it might be in the far future when I'm going to experiment with rear wheel drive and tubeless tyres.


Summary:
Knowing what I know now, I would've save at least AUD600 in the last 5 years, i.e. no need to buy a new motor, and less drive train change-out due to less wear and tear.

So far, I clocked up around AUD3,500 in cost (the bulk of the cost are 2 sets of motors and batteries). Predicting my second set of battery will be good for the next 500 cycles, that translates to AUD1.75 cost per trip (6.5cents per km). If I implemented my lesson learnt from the start, that would've brought the cost down to AUD1.45 per trip (5.4cents per km). Not bad!

Wednesday, 6 June 2018

Powerwall 2 Time Base Control Algorithm

Since PW2 (Tesla Powerwall 2) introduced the new TBC (Time Base Control) algorithm, I had a great difficulty in trying to understand the actual algorithm, especially during shoulder period. Consulting forum (such as here and here) only confuses me further, especially when the forum started to discuss incentives and local regulations (US centric). This, however, makes me appreciate the herculean task for PW2 engineers. You simply can't make everyone happy.

The ever evolving nature of PW2 algorithm (typical Tesla my guess), makes any 'User Manual' writing attempt a futile exercise. Reverse engineering the algorithm also requires different permutation, such as state of charge, how much PV production during the day, etc that can affect the PW2 behaviour.

Still, little documentation is better than nothing. Since I don't have the stamina to try all permutations, I deliberately write down as much details below (trying to be as neutral as possible, i.e. no incentive and regulation jargon):

Off-Peak Cost Saving Mode:
In this mode, PW2 does try to aim a certain State of Charge prior entering shoulder and peak period (by charging from the grid if necessary). Based on the limited 2 days experiment (see screenshot below), this State of Charge (SoC) is not a fixed value. How does PW2 decides this SoC level? Me no idea.


Also, some charge from PW2 is used during off-peak period (see bubble number 1 in the screenshot). I don't know how PW2 decides when to use the battery. One thing for sure: it mostly uses the grid to conserve the SoC for peak period.

I haven't tested what happens when you have solar production during off-peak period.

Shoulder Cost Saving Mode:
Now this gets interesting. In day 1 of the test (see bubble number 2), my PW2 behaved as I wanted it, that is: no grid activity (i.e. to behave exactly like peak). Too bad I didn't record the SoC, but I remembered it was roughly 40-ish percent at this stage.

In day 2 (see bubble number 3), my PW2 started to be less agressive (despite higher SoC compared to the previous day), i.e. grid activity is allowed by importing and exporting. Uh oh, for me, who has a power provider that value exported PV close to zero (yup, zilch, nada), this is bad news. Also, why PW2 allows a significant grid import when the battery SoC is relatively high (roughly 60-ish percent at bubble number 3). Is this because PW2 hasn't learnt that I don't usually use lots during peak period? My guess at this stage, this is due to the PW2 algorithm is based on US-centric market, where they have incentive to export PV to the grid (such as net metering). Pure guess though.

At this stage, my panic mode was on, and I switched it back to 'Self-powered' mode (as commented by the red line), which explains why the screenshot is no longer showing peak/off-peak on the 14-th May, and also 100-ish watt grid consumption during solar production after the switch (see my previous post).

After 14th of May, I changed PW2 to 'TBC Balanced' mode and extended the peak period to also cover shoulder (i.e. only peak and off-peak, no shoulder). This has worked perfectly for me, but...

In the last 2 days, I haven't had enough PV production to cover my shoulder and peak. This has caused me grief since now I need to import from the grid during peak period (see bubble number 4). So, I changed it to TBC 'Cost Saving' mode, thinking that PW2 would've charged from the grid during off-peak to cover my PV production shortfalls. To my surprise, it didn't (although the SoC was just a tad below under reserve).

So, here I am, finding another quirk in PW2 algorithm. If you don't set the shoulder period,  PW2 will not charge from the grid (despite the PW2 SoC at the reserve level). What the??

In the screenshot below (see bubble number 5), you can see that as soon as I bring back the shoulder period, PW2 behaves as I expected again by start charging from off-peak grid (I've found this by coincidence).

In short, for those who want exporting to the grid at the very lowest priority, I recommend to use 'TBC Cost Saving' mode with a wee bit of shoulder period (just enough to activate 'charge from off-peak grid mode').


PS: Peak period behaviour is consistent as expected, i.e. no import from the grid.

Monday, 13 November 2017

My Observation of Tesla PowerWall2

My Tesla Powerwal 2 (PW2) summary, freshly installed just 3 days ago:
[UPDATED 7 May 2018: see point 6 below]
  1. PW2 can be installed in multiphase (mine is 3-phase). PW2 monitors each phase current using Current Transformer (installed by the installer of course).
  2. PW2 basically absorbs all your solar power instead of injecting them back to the grid. What is worth to be noted, although you have load on different phases, the PW2 will compensate this so that your electricity meter reads export as 'zero' (since Australian domestic electricity meters don't care on which phase you're consuming). So, in my example, I was using an induction stove top at 1000 Watts on the 'white' phase, and the PW2 injecting back to the grid at 1000 Watts at 'red' phase, resulting net zero export. To mention the obvious, PW2 inverter maxed out at 5kW power.
  3. Non-noticeable transfer time when the grid has failed. I've tested this 2 times: at first attempt, the solar panel inverter anti-islanding has to reset (causing the solar power to cut for about a minute). In the second attempt, the solar inverter didn't trip at all (as if nothing happen). I'm definitely impressed on this one. To mention the obvious, only 'red' phase of my home is backed up by PW2. Other phases are not. Now I can officially welcome mad max scenario!
  4. During daytime (when the solar panel is active), I've noticed PW2 constantly draws around 100 Watts from the grid, but not at night time. I can't find any info in the internet on the why, yet. My guess, PW2 requires power for its own functionality and ineffeciencies in converting AC to DC and somehow only compensates during daytime? 
  5. It is also worth to be noted, unlike the Tesla cars, users can't set the maximum charge level on PW2. My guess, Tesla is now extremely confident that this is no longer required. Maybe combination of newer chemistry and internal software to limit when required during hot days?
  6. My particular one consistently under report kWh used and exported to the grid by roughly 15 - 20% (compared to my grid provided meter). However, the solar energy kWh is spot on (compared to my soalr inverter kWh measurement). No idea the why. Anyone experiencing the same issue?


What it doesn't do and I wish Tesla will update this functionality sometimes in the future:

  • Change the timing on the 100-Watt constant draw from the grid. I wish this is user configurable. For example, to draw this at night time, or to use solar panel instead. For me who on Time of Use plan, this total of 1kWh on daytime is something I'm not willing to pay the grid for. Call me stingy.
  • Ability to charge PW2 from the grid during off-peak via the app. At the moment PW2 only absorbs power from solar panel. Since my solar panel is not enough for my usage, I'd love to have the ability to get cheaper electricity at night to be used by my household during peak time. Quicker ROI anyone?


Now, to how I use the Tesla app:

  • Once the installer enter account holder details via the installer page, your PW2 will be immediately visible on the Tesla app (you'll need wi-fi router for PW2 to connect to Internet). I haven't accessed the PW2 directly via the ethernet router (no reply). Will try again next time.
  • The visualisation of the app is indeed very useful. For a data hoarder like me, the visualisation has altered my energy usage. For example, now I know my inverter reverse cycle Air Conditioner doesn't have linear energy consumption (I thought it does). It has step changes, i.e. 2.4kW at full power, then 1.5kW, then 900 Watts at lowest power (in cooling mode). When the PW2 is low in charge, I deliberately turn off my air-con to minimise grid usage and happy with slightly higher room temperature (but still comfortable). My guess, sometime in the future, all home appliance will talk to each other (via ethernet router, just like the PW2 at the moment) and have AI (Artificial Intellegence) based on user preference on how and when to consume energy (whether to save energy, or maximum comfort).


So here is my data, just 1 day after it's being installed (grid data not shown for clarity):

Tesla PW2 App Visual


The data above is definitely not my average day. I had to travel 120-ish km on that day, so most consumption gone to EV (I'm guessing around 18kWh).

Now my debt has increased significantly again (thanks to PW2 as an expensive toy), so the family now have to be content living from boiled water and salt. At least we have a good-lookin' dead weight on the wall now (wheel added in MS Paint to make me feel less guilty by the dead weight):


[UPDATE 12 Oct 2020 for 2018 annual figure]:


Tuesday, 6 September 2016

Motor Listrik

Akhirnya, Indonesia akan memproduksi sepeda motor listrik [1]. Sedikit telat, tapi lebih baik telat daripada tidak sama sekali. Menurut saya, tidak ada yang spesial dari sepeda motor listrik ini. Modelnya hanya mencontoh dari motor bebek. Eropa, Amerika, Cina, Jepang, dan banyak negara lainnya sudah memproduksi sepeda motor listrik mereka sendiri, dan modelnya jauh lebih menarik.

Melihat spesifikasinya, produsen motor listrik ini mengunggulkan koneksi ke smartphone Android. Daripada menambah fungsi-fungsi 'nggak-penting' (untuk apa CPU ber-GHz di motor listrik??), produsen motor listrik di Indonesia, bersama dengan pemerintah (PLN), seharusnya juga memproduksi motor listrik untuk kelas 'ekonomi'. Sistem Baterai yang sama juga bisa digunakan untuk elektrifikasi daerah pedalaman yang sulit terjangkau oleh listrik.

Saat ini, banyak daerah pedalaman yang masih menggunakan gen-set untuk mendapatkan listrik. Bahan bakar untuk gen-set di daerah pedalaman, apalagi ratusan pulau di Indonesia Timur, harganya tidak terjangkau (berhubung mahalnya ongkos kirim). Walaupun beberapa daerah mendapat subsidi, anggaran tersebut seharusnya digunakan untuk kepentingan lainnya, seperti membangun infrastruktur daerah.

Stasiun-stasiun pengisian baterai (dari panel surya, atau sumber energi terbarukan lainnya) dibangun di daerah-daerah ini untuk mengisi baterai motor listrik. Bagi yang mampu, bisa memasang panel surya sendiri di rumahnya. Dengan sistem energi terbarukan, tidak perlu lagi bayar ongkos kirim untuk bahan bakar. Sampai di rumah, baterai yang sama bisa digunakan untuk lampu, TV, dan pengisian telpon genggam dan banyak lainnya. Sistem peminjaman juga harus diterapkan, karena tidak mungkin masyarakat membayar harga motor-motor listrik ini.

Baterai untuk motor listrik ini tidak dapat diremehkan. Dengan kapasitas hampir 2kWh, baterai ini bisa digunakan untuk mengoperasikan kulkas kecil beberapa hari. Sulitnya implementasi di lapangan, saat ini, karena tidak adanya standardisasi untuk tegangan rendah. PLN seharusnya mempelopori standardisasi tegangan rendah untuk daerah pedalaman. Dengan adanya standardisasi ini, produsen-produsen lokal bisa mulai memproduksi peralatan rumah tangga yang mampu menggunakan baterai yang sama dengan motor-motor listrik ini. Contoh, motor listrik ekonomi mungkin bisa menggunakan baterai 48-Volt, dan peralatan rumah tangga untuk daerah-daerah pedalaman ini (seperti lampu, kulkas, sampai kompor listrik dengan induksi) bisa menggunakan sistem ini juga.

Kalau saya sendiri saja sudah merakit sepeda listrik sendiri dan diisi ulang oleh panel surya. Masa produsen besar tidak bisa?


Sekali tepok, ratusan nyamuk. Tidak perlu konek-konek-an ke Android.

Sumber:
[1] http://www.jpnn.com/read/2016/05/05/401025/Ini-Keunggulan-Gesits-Motor-Listrik-Buatan-Indonesia-

Wednesday, 2 March 2016

Secondary Battery System for Camping Trip

So, I've done a few research into 4WD battery system (dual battery system) since I had few colleagues asking me what secondary battery system is best for their 4WD camping-bush-trip. The more I look into this (in Australian market), the more I am impressed of how expensive these battery systems are. By simply looking into REDARC website, one should wonder, why on earth battery management system can cost in the order of thousand of Australian dollars (excluding batteries). There is nothing 'smart' with lead acid batteries! Boy oh boy!!

It is true that you need some charging management system so that your car is protected from over-loading in charging deep-cycle batteries. But, do you really need to spend thousand dollars computerised battery charging system?

"People don't buy for logical reasons. They buy for emotional reasons" rings so true in this 4WD market. Just looking around the car park at my work, people spent literally tens thousands of dollars to upgrade their 4WD (or cars, generally). Nothing wrong with that of course, here is me being hypocritical, willing to spend hundreds of bucks accumulating second-hand batteries to satisfy my emotional needs! Luckily I can't afford those yet.

Anyhoo, for those who want to go camping trip, and simply need pure battery function (no emotion involved), then I got a surprise for you! Please don't buy those off-the-shelf power pack (the like of ArkPak) with batteries from camping shop, they are a RIP-OFF!! If you can tinker a bit, then you can save literally hundreds of dollars!!! (yup, that's right, 3 exclamation marks)

Here is my proposal (no need to tinker your car wiring either):


Component list:

  1. Cigarette Lighter 12V plug from Altronics (click here)
  2. DC – DC converter (to be set to 13.8 Volt and 5 Amp). Get it here.
  3. 12V 100Ah lithium battery
  4. Low voltage protection switch
  5. 12V cigarette lighter socket


Technical note:

  • The setup above is charging the lithium battery one way only, i.e. no current back flow from lithium to your car system.
  • Since you plug it to your car's cigarette lighter socket, it ONLY charges when you turn the engine on. Do keep it connected all the time to ensure the battery charged, always.


The whole lot above can give you up to 1000Wh of electricity and cost less than AUD1000. Forget those expensive ArkPak or the like that can cost you more than double of what I proposed above. Well, yes, you do need to tinker a bit, but hey, I'm talking to those who are adventerous right? The electric is so simple: red to positive, black to negative. Come on, it's not rocket surgery (or brain science)!

If you feeling even more adventerous, you can replace the supply (item 1 and 2) with solar panel (minimum 60 Watt) with MPPT module. For the MPPT, I can recommend Genasun. Please, please, please, simply skip crap 'charge controllers' and save yourself troubles.

Happy camping!


Thursday, 8 October 2015

Proposal Elektrifikasi Pedalaman Indonesia

Pedalaman Indonesia masih banyak yang belum terjangkau oleh listrik karena infrastruktur yang masih minimal. Memasang jaringan kabel listrik ke daerah pedalaman masih sulit dan mahal.

Biasanya, daerah pedalaman menggunakan genset (generator set). Nah, menggunakan BBM untuk listrik sangat boros dan mahal. Contoh, hanya untuk penerangan dan mengisi ulang baterai, penduduk ini [2] menghabiskan Rp50,000 per malam . Boros bukan?

Belum lagi masalah logistik bahan bakar minyak ke daerah pedalaman. Semakin terpencil, semakin sulit untuk mendapatkan bahan bakar. Contoh, di daerah Timur Indonesia, bahan bakar saja sampai dikorupsi [3]. Waduh, sudah jatuh, tertimpa tangga pula!

Nah, kebanyakan dari kita (yang bisa akses internet dan baca) sudah tahu, bahwa panel surya jauh lebih cocok untuk elektrifikasi daerah pedalaman. Dengan tidak perlunya bahan bakar (kecuali sinar matahari), semua masalah di atas, ya teratasi!

Tapi, kenapa kita (Indonesia) masih sulit menerapkan sistem panel surya ke daerah pedalaman? Instansi pemerintah sudah banyak yang mencobanya [4], dan juga organisasi non-profit [5], dan banyak lainnya. Tapi, tetap saja masih banyak desa dan daerah pedalaman yang belum terjangkau listrik. Tanya kenapa?

Menurut saya, masalahnya bisa dikategorikan sebagai berikut:

1. Keterjangkauan Harga
Panel surya dan baterai memerlukan harga beli yang tinggi, walaupun ongkos operasional selama penggunaan hampir nol. Masalahnya, para pengguna hanya sanggup membeli dengan harga beli yang rendah, dengan harga operasional yang 'terjangkau'.

Masyarakat pada umumnya lebih memilih untuk membeli gen-set kecil seharga satu juta dengan membeli BBM seumur hidup (ongkos operasional), dibanding membeli perangkat panel surya dan baterai seharga 3 - 4 juta rupiah (walaupun tanpa biaya operasional sepeser pun).

2. Standardisasi
Melihat contoh-contoh sukses dari lapangan (seperti [4] dan [5]), masih belum ada standardisasi seperti: tegangan, baterai, dan colokan apa yang dipakai. Semuanya terserah donatur.

Dengan adanya standardisasi, harga sistem secara keseluruhan bisa menjadi lebih murah. Para supplier tidak perlu memproduksi berbagai macam colokan, satu saja cukup. Contoh: bagi yang tinggal di kota, selama punya 'colokan' listrik, tinggak 'nyolok' bukan? Nggak usah pusing-pusing mikir colokannya nggak cocok, atau tegangannya ngaco?

Semakin banyak kompetisi untuk hal yang sama, harga akan menjadi lebih murah, gampang kan?

3. Skalabilitas
Lanjut dari masalah sebelumnya, berhubung tidak adanya standardisasi, sistem panel surya yang dibagikan ke rakyat sejauh ini tidak bisa di-'upgrade'. Kalau ada pengguna yang mau menggunakan listrik lebih kuat (kulkas, mesin, dll), bagaimana sistem yang sudah ada mengatasinya?

Sejauh ini, berhubung tidak ada standardisasi, kalau mau 'upgrade', ya mesti beli sistem yang lebih besar. Sistem sebelumnya jadi sama sekali tidak bisa digunakan. Ini sebuah pemborosan dan mahal.


Proposal:
Nah, berhubung saya nggak punya duit, proposal saya hanya untuk mengatasi standardisasi, alias 'the low hanging fruit'. Yang gampang-gampang dulu aja, yaitu standardisasi.

Berhubung produk di pasaran sudah banyak yang menggunakan 12 Volt, kenapa kita tidak mulai dari standardisasi 12V? Ya, tentu saja menggunakan AC 220V lebih ideal. Tapi, siapa yang mampu memasang dan merawat peralatan 220V AC? Kita harus realistis. Berhubung belum banyak teknisi listrik di pedalaman, yang kita butuhkan adalah peralatan pembangkit listrik yang bisa langsung digunakan oleh rakyat pedalaman, dan untuk dirawat oleh mereka sendiri.

Semua colokan juga di-standardisasi, jadi kalo salah 'colok', tidak mengakibatkan konsekuensi yang drastis.

Contoh proposal:


Ilustrasi sebagian diambil dari [6].

Dengan standardisasi 'colokan' dan tegangan, pengguna di pedalaman bisa menikmati keuntungan seperti penduduk di kota. Tinggal colok! Kalo mau 'upgrade', tinggal colok panel surya dengan hubungan paralel, dan juga batre, tidak perlu beli sistem baru dari 'nol'. Proposal sistem di atas juga dirancang untuk digunakan oleh pengguna yang kurang melek listrik-listrikan. Gampang kan?

Standardisasi juga menyederhanakan sistem logistik dan penerapan di lapangan. Donatur atau supplier manapun tinggal pasang-colok (plug and play) dengan sistem yang lain. Nggak perlu pusing panel surya buatan apa, dan runcian teknis lain-lainnya.

Kunci utama standardisasi adalah '12VDC bus' [8]. Selama ini diterapkan, semuanya menjadi jauh lebih mudah. Bagi pembaca yang melek panel surya, mungkin bertanya, "Itu penerapan 'kotak elektronik' dari panel surya ke '12VDC bus' gimana?"

Naaah, ini bisa diterapkan oleh:
1. Beli produk yang sudah ada di pasaran (alias '12V charge controller')
2. Bikin sendiri (produk dalam negri). Kalo saya sendiri aja udah bisa rancang dan bikin sendiri [7], kenapa situ nggak bisa?

Dari hitungan saya, harga beli sekitar 3 juta rupiah per unit. Ini untuk panel surya 50Watt-peak (dengan elektronik), dan baterai lithium 12V 20Ah, lengkap dengan colokan. Ini cukup untuk penerangan dan isi ulang batre handphone. Berhubung memakai batre lithium, sistem ini akan tahan selama 10 tahun, alias Rp 25,000 per bulan (kredit tanpa bunga selama 10 tahun)! Murah mana, dibanding Rp 50,000 per hari untuk pemakaian BBM?

Walaupun sistem ini masih belum bisa bersaing dengan harga PLN (harga sistem ini masih sekitar Rp 5,500 per kWh selama 10 tahun, dibanding harga PLN sekitar Rp 1,500-an per kWh), kita harus realistis. Sistem ini masih jauh lebih murah (daripada genset) untuk daerah pedalaman yang belum terjangkau listrik. Lagipula, harga PLN akan terus naik selama 10 tahun ke depan.

Bagi yang kebanyakan duit, silahkan hubungi saya! Duitnya akan saya pakai untuk elektrifikasi pedalaman Indonesia. Dijamin tokcer! [1]


Referensi dan catatan:
[1] Duit nggak bisa minta balik!
[2]  http://health.kompas.com/read/2012/09/29/03513482/listrik.untuk.kaum.pedalaman
[3] http://wildlifenews.co.uk/2014/05/indonesian-cop-is-jailed-for-eight-years-for-major-timber-smuggling-racket/
[4] http://regional.kompas.com/read/2013/04/25/09085871/Pemkab.Barito.Utara.Alokasikan.300.Unit.PLTS
[5] http://id.kopernik.ngo/update/menjangkau-desa-pedalaman-bersama-mama-mia
[6] http://www.solar-electric.com/how-to-use-mc4-connectors-cables.html/
[7] http://epxhilon.blogspot.com.au/2014/06/bmppt-solar-charger-3.html
[8] 12V dipilih karena lebih banyak pilihan untuk produk konsumen yang sudah ada di pasaran, dibanding sistem 48 volt misalnya (digunakan oleh: http://news.mit.edu/2015/microgrids-rural-villages-india-0601)

Tuesday, 25 August 2015

36V 11.6Ah Super Tube Battery Real Life Review

UPDATE 31 Aug 2015: BMS board fixed, my old battery is now up and running again! Simply clean the salt bridge due to moisture penetration. All those riding in the wet did take its toll!

------------

For lithium batteries, people always discuss how many charge-discharge cycles their battery last, but very few data regarding the electronics (i.e. the BMS, or Battery Management System).

My beloved 36V 11.6Ah tube battery (with original Panasonic cells) just died on the weekend :(. To my surprise, the cells themselves are still good. It's the electronics inside the battery system that is the culprit, i.e.:

  • the charging port is no longer be able to charge, and
  • the 4-pin output port also gives no output voltage (but can charge from this port).

This particular battery electronics have MOSFET driven switch for ON/OFF switch and the charging port ideal diode circuit (on top of the BMS).

I initially thought the PCB must have corroded since I always ride regardless weather (and it's been very wet lately). However, when I opened the BMS, it was dry-as, no sign of moisture what-so-ever (kudos for the battery design and build).

Since I have no time (yet) to further dissect the electronics, I already purchased the same battery for replacement. Again, to my surprise, the new battery did not perform any better compared to the old one. This, basically saying, the old battery has NOT lost ANY performance compared to new.

I get to work in 45 - 47 minutes (27km one way distance), which was same time compared to old one. When fresh, my cycle analyst shows peak power close to 800 Watts (old battery did the same). So, WOW! However, I haven't had the guts to test the capacity loss though. My guess the old battery probably have lost some of its capacity.

So, for documentation sake, my old battery has gone through (according to cycle analyst):

  • 497 cycles
  • 3701 Ah total


Based on the above, average 7.45Ah usage (65% Depth of Discharge) for its lifetime. And no noticable performance degradation. Impressive indeed.

Now, somehow I need to fix the electronics...

Tuesday, 21 April 2015

Cheapest Commuting Challenge


What is the cheapest form of commuting [7]?

With my electric bicycle, I commute 54km round trip with 460Wh of energy, or 8.5Wh/km [1]. This energy usage is equivalent to 0.052 litres of fuel, or 0.1 litre/100km [2].

Well, hangon, surely it is cheaper to pedal with your own muscle, right? That's what I thought as well. So, being a skeptic, I did my own calculation:

Assume the rider is from Tour de France (NOT me), which can 'easily' produces 300 Watt all the time in the commute duration (to achieve the same comparison with my electric bike commuting). Let say the rider manage to output 460Wh exerted at the same time duration (1 hour and 40 minutes round trip). The rider would need 400 Calories [3]! Quick googling tells me, this is equivalent to a bigmac [4].

For food cost, this translates to $5 for a round trip. Heck, that is the same cost (fuel only) if I use my Toyota Corolla! There you go. Human powered commuting is NOT cheap [5]! (Of course, I'm ignoring the health benefit here).

My electric bike fuel cost? ... Nothing! That's right, because mine is solar powered (one way). The other way, I charge at work for free :)


"Wait a minute, you have not included your capital cost!" I hear someone complaining. Well, since I'm a cheapskate, my total electric bicycle cost is around AUD1,600. This price includes: new electric bike kit, second hand bike, second hand solar panel, and my own custom MPTT charger [6]. To date, I've clocked 11,000km and 420 cycles of charging (quite deep too) and definitely still have my 80% capacity (I haven't had the guts to test the actual remaining capacity). I predict I'll be good for at least another 400 cycles (before I need to buy a new battery), so the life-cycle cost would be AUD1,600 / 800 trips = 2 bucks a trip (or 7.5 cents per km). Try to beat that!

References:
[1] Exact value is highly dependent on wind. This figure is anywhere between 350 to 550Wh. The average speed for the whole ride is between 33 to 34km/h (not much affected by wind, almost none I say). Data source from installed Cycle Analyst on-board (http://www.ebikes.ca/product-info/cycle-analyst.html)
[2] A litre of fuel contains 8.9kWh of energy, using data from http://www.afdc.energy.gov/fuels/fuel_comparison_chart.pdf
[3] 460Wh = (460Watt)(3600seconds) = 1.656MJ = 396kcal (or 396 food Calorie, yes the Calorie unit IS confusing)
[4] Assuming 100% efficiency converting those bigmac calories to pedal energy.
[5] More reading if you don't trust me: http://www.fao.org/docrep/010/ah810e/AH810E08.htm
[6] http://epxhilon.blogspot.com.au/2014/06/bmppt-solar-charger-3.html
[7] For smart a$$ out there that says "cheapest commuting is no commuting at all, i.e. work at home!". To that, I can't top it off. Yes, I agree with you.


Thursday, 16 April 2015

Perbandingan On-Grid dengan Off-Grid

“Listrik saya mahal banget! Pake panel surya bisa jadi lebih murah nggak yah?”, keluh pelanggan PLN, yang memakai banyak listrik gara-gara pake AC seharian.

“Bisa lah!”, jawab saya.
“Pasangin donk!”, jawab situ.
“Sini, kasih gue 25-juta”, jawab saya lagi.
“Gila luh, mending gue nggak pasang”, jawab situ.

Masalahnya, walau panel surya bisa mengurangi biaya listrik, harga pasangnya memang sangat mahal. Pertanyaannya, “ada nggak sih, perhitungan untung-rugi pasang panel surya?”.

Nah, tulisan kali ini bertujuan menjawab pertanyaan ini. “Kapan gue untung kalo pake pasang panel surya?”

Mari, kita semua berpegangan tangan dan cipiki (cium pipi kiri) dan cipika (cium pipi kanan) sesama. Karena, PLN sudah memberlakukan ‘net-metering’ melalui peraturan PLN nomor 0733.K/DIR/2013 [1].

Dengan adanya peraturan PLN ini, motivasi untuk memasang panel surya ‘supaya untung’, dapat terealisasi.

Contoh masalah:

Seorang pelanggan PLN menggunakan listrik sebanyak 300kWh sebulan (atau 10kWh) sehari, gara-gara pasang AC seharian. Menurut tarif PLN terakhir [2], si pelanggan harus membayar 400-ribu rupiah sebulan (Rp 1.352 / kWh, untuk golongan R-1/TR).

Dari contoh penggunaan di atas, bagaimana menghitung kalau pemasangan panel surya itu untung atau rugi? Berapa besar panel surya yang harus dipasang supaya untung? Ngitungnya gimana nih?

Tunggu dulu, perhitungannya memang tidak segampang ‘1 + 1’, tapi nggak rumit juga. Sebelum nyebur lebih dalam, harus diingat, tujuan akhir dari hitungan adalah mengetahui kapan modal kita bisa balik (inggrisnya ROI, Return on Investment).

Dari perhitungan saya [3], di Indonesia, pasang panel surya on-grid bisa modal balik dalam waktu 13 tahun (alias Return on Investment sekitar 7.7%). Jangan lupa, jangka hidup panel surya itu dijamin selama 25 tahun. Jadi setelah modal balik (13 tahun), selebihnya untung…tung…tung.

Terus, off-grid itu apa?

Waduh, ini topik tersendiri dan lumayan rumit. Intinya:

  • On-grid: terhubung dengan 'grid'. 'Grid' di Indonesia adalah PLN.
  • Off-grid: tidak terhubung dengan 'grid'. Jadi nggak ada hubungannya sama PLN.


Jadi, pedalaman Indonesia yang memakai gen-set itu 'Off-grid', karena tidak terhubung oleh PLN.

Referensi:
[1] http://www.containedenergy.com/residential/pln-net-metering-indonesia/
[2] http://www.pln.co.id/blog/tarif-tenaga-listrik/

[3] http://epxhilon.blogspot.com.au/2015/04/menghitung-untung-rugi-sistem-panel.html

Menghitung Untung Rugi Sistem Panel Surya On-Grid

Langkah menghitung untung-rugi pemasangan panel surya on-grid:
  1. Dapatkan ongkos pasang (total, termasuk inverter dan ongkos pasang);
  2. Hitung berapa banyak kWh yang dihasilkan oleh sistem di atas, per tahun;
  3. Hitung berapa Rupiah yang dihasilkan dalam setahun;
  4. Hitung Return on Investment, atau butuh berapa lama supaya modal kita balik.


Contoh hitungan:

1. Mendapatkan total ongkos pasang:

Masalahnya, melihat pangsa pasar di Indonesia sekarang, pemasangan sistem ‘on-grid’ di Indonesia belum marak. Alhasil, harganya tidak bersaing (alias mahal). Berhubung saya belum dapat menemukan data, mari kita berasumsi harga pemasangan di Indonesia sekitar USD2,5/Watt (atau sekitar Rp 25.000/Watt). Asumsi ini untuk menunjukkan contoh perhitungan. Prakteknya, kemungkinan besar lebih murah.

Menggunakan asumsi ini, kita akan membutuhkan modal sebesar 25 juta rupiah untuk sistem panel surya sebesar 1.000 Watt.

2. Berapa banyak kWh yang dihasilkan per tahun:

Ini tergantung banyak hal:
  • Tempat tinggal (Indonesia itu gede);
  • Apakah panel surya terhadang oleh bayang-bayang (dari pohon atau gedung lainnya) ketika matahari bersinar;
  • Iklim setempat.

 Untuk Indonesia, sepertinya produksi rata-rata 4kWh per hari (dari sistem sebesar 1kW) cukup akurat (melihat peta dari referensi [1] dan juga [2]). Dengan asumsi ini, kita mampu mendapatkan listrik sebanyak 1.460kWh dalam setahun.

3. Hitung penghasilan (Rupiah) per tahun:

Menggunakan tarif PLN terakhir (Rp 1.352 per kWh, untuk golongan R-1/TR [3]), dan dari hasil hitungan sebelumnya (1.460kWh per tahun), kita mampu menghasilkan (offset) sebesar 1.9 juta rupiah setahun.

4. Hitung berapa lama modal balik (Return on Investment):

Dari total ongkos 25 juta rupiah, dan penghasilan 1.9 juta rupiah setahun, kita baru balik modal setelah 13,2 tahun [4].

Kesimpulan:
  • Setiap 1.000 Watt panel surya dipasang, kita menghasilkan (atau meng-offset biaya) 1.9 juta rupiah per tahun. Untuk sistem lain, lebih kecil atau besar, tinggal dibagi atau dikali dengan faktor per 1.000 Watt.
  • Pasang panel surya on-grid di Indonesia, dijamin untung! Walau beberapa pembaca akan bilang, balik modalnya lama amat yah (13 tahun)? Mudah-mudahan ini akan membaik. Jika total ongkos pasang hanya Rp15.000 / Watt (Rp 15 juta untuk 1.000 Watt), balik modal (ROI) hanya sekitar 8 tahun.
  • Untung-rugi tidak tergantung berapa banyak pemakaian, dengan syarat kita tidak menghasilkan lebih dari yang digunakan. Kalau menghasilkan lebih, ya nggak dibayar sama PLN [3].


Catatan dan Referensi:
[1] http://solargis.info/doc/free-solar-radiation-maps-GHI
[2] http://www.solarchoice.net.au/blog/wp-content/uploads/Solar-Choice-Clean-Energy-Council-Solar-PV-Consumer-guide.pdf
[3] http://www.containedenergy.com/residential/pln-net-metering-indonesia/

[4] Mayoritas panel surya memang memiliki jaminan 25 tahun. Tapi, inverter biasanya hanya 10 tahun. Yang murah atau jadul, paling cuman tahan 5 tahun. Jadi, hati-hati! Ongkos total bisa naik (karena kita harus menghitung ongkos selama 25 tahun untuk akurasi hitungan di atas).

Wednesday, 15 April 2015

Menuju Rumah Mandiri Energi: Pendahuluan

“Saya memakai beberapa lampu dan kipas angin, butuh berapa panel surya supaya rumah saya tidak perlu PLN lagi?”

“Saya sudah muak PLN byar-byar-pret melulu. Panel surya bisa mengatasi masalah ini nggak?”

“Kalau gubuk aja udah pake panel surya, kenapa kita tidak bisa?”


Sepertinya komentar-komentar seperti ini sudah tidak asing lagi belakangan ini. Nah, tujuan artikel ini adalah untuk menjelaskan secara terinci, apa yang dibutuhkan untuk mandiri dalam hal kelistrikan, alias, tidak perlu PLN (Off-Grid). Sebelum terjun ke ‘Off-Grid’, perlu diketahui ada juga yang namanya ‘On-Grid’. Untuk perbandingan on-grid dengan off-grid, ini merupakan topik tersendiri: klik disini.

Andai saja jawabannya sederhana, “Beli aja UPS (uninterruptible Power Supply), terus colok listrik rumah ke situ. Gampang toh?”. Kalo rumah situ gubuk, ya ini jawaban yang benar. Tapi, kalau rumah situ lebih besar dari gubuk, untuk mengandalkan seluruh rumah berdasarkan tenaga surya, ini lebih rumit.

Sebelum menjelaskan lebih lanjut, saya akan jelaskan ‘melistriki’ rumah, dengan analogi ‘mengairi’ rumah:

Dalam ‘mengairi’ rumah modern, air disalurkan ke seluruh rumah melalui pipa-pipa. Nah, biasanya, tekanan air dari PAM (Perusahaan Air Minum) sangat rendah, sehingga tidak bisa langsung digunakan.

Solusinya, air dari PAM ditampung di bak besar, lalu dipompa ke seluruh rumah. Alternatifnya, air dari PAM ditampung di bak yang berada di ketinggian, lalu disalurkan ke seluruh rumah melalui gravitasi. Ilustrasi sebagai berikut:


Nah, melalui ilustrasi di atas, kita bisa tahu beberapa hal berikut:
  • Berapa banyak air yang dibutuhkan oleh semua penghuni rumah? Dalam sehari? Seminggu?
  • Berapa banyak air yang harus di-supply oleh PAM?
  • Berapa besar bak air yang harus digunakan?


Dari analogi di atas, pertanyaan ‘berapa banyak panel surya dan baterai yang saya perlukan?’ bisa dijawab dengan menggunakan analogi bak air di atas:
  • Berapa banyak listrik yang saya konsumsi? Sehari? Seminggu?
  • Berapa banyak listrik yang butuh di-supply? (Alias, berapa banyak panel surya yang saya butuhkan)
  • Berapa banyak baterai yang saya butuhkan?
Nah, dalam tulisan selanjutnya, akan saya bahas lebih lanjut.

Thursday, 12 June 2014

BMPPT Solar Charger (3)

In pursuit improving my Boost MPPT charger, I have done the following:


  1. Update the software to use in-built PWM functionality of Arduino Uno. I've found out increasing frequency of the PWM is easy-as (simply add a line of code!!). The converter is now no longer making audible noise. Also, I get back most of the computing power of the Uno, instead of fully dedicated PWM routine. The negative of increasing PWM frequency is reduced efficiency. In my case, running 31kHz has reduced efficiency by 1%!
  2. Use MOSFET gate driver: this has increased efficiency by 2 - 3%, not bad! My inexperience made me choosing MOSFET gate driver without under-voltage lock-out, which caused the converter unstable during start-up. After much troubleshooting, I've found out the MOSFET gate driver locks the MOSFET to ON position during low voltage start-up, which cause the whole circuit short-circuited. This is now rectified by choosing another driver with under-voltage lock-out;
  3. Inductor: I've wound my own inductor using proper gapped core ETD34 core with much thicker copper wire. This has increased the current capacity and reduced EMI (so they said). However, no increased efficiency whatsoever compared to my old cowboy inductor.


I'm a bit disappointed that I haven't managed increased the efficiency significantly. I suspect my measurement method is inaccurate. As I simply read the watt reading from the el-cheapo watt-meter at the input. As the current is rippling, actual watt figure is probably different. So, next time I need to measure it properly using oscilloscope. None of the component is hot this time, so surely it's better than 90%.

New Schematic:


New software, click here. Note that the software includes my customised voltage selection during start-up. This is to accomodate my lead-acid 24V battery charging for the UPS. Yup, that's right, my shed is now off-grid too!

Thursday, 8 May 2014

Arduino Uno Shield Boost MPPT Cost

So, how much it cost exactly my home-made Arduino Uno shield for Boost MPPT charger? Have I reached my original goal to create the el-cheapo version of Genasun boost MPPT lithium charger?

If I didn't account for:

  • Hundreds of hours spending time in this project (I'm a slow learner),
  • Buying an awesome picoscope USB oscilloscope (to find out what was wrong with my boost converter due to my lack of knowledge),
  • PCB making infrastructure (solder, etching, etc etc).


Then the answer is absolutely yes! So far, components only cost me AUD65.80. If I were to get Genasun, that would cost me USD300!! Yes yes, it would financially much more beneficial if I were to buy the Genasun in the first place and not spending hundreds of hours and testing equipment... but... I learnt a lot from this project.

Breakdown of component cost as follow:


Total minimum purchase cost is shown above, as the minimum retail quantity was not one. I purchased them all from RS components.

There are components not shown in the cost table above (i.e. resistors and some diodes) because I've used my left-over components from my previous adventure. I ended up buying new Arduino Uno board, because I've blown up my original Uno freebie due to my own stupid mistake (literally, there was smoke coming out from the board after a 'POP'). So stupid, I won't share.

I can't share my board layout as it's riddled with problem, i.e. power jack is sitting on top of the USB connector, and the current sensing pad size is slightly wrong. I 'designed' the board using Microsoft Word, how silly is that?

Too bad, no one (that I can find in Google) has made buck/boost Arduino shield, nor boost only version that I can buy. So, until then, I'll be still using mine in the near future. 

Tuesday, 6 May 2014

Boost MPPT Charger Details (1)

So, meanwhile fresh in my mind, I'd better document how the software works. Following flow chart is the simplified version of my Boost MPPT charger Arduino Uno code:


Would I code this differently? Of course! But, the code as-is, works well. It has been tested with me trying to break it to find bugs. After various testing, this code has been fine tuned. For example, 5000 cycle times for the PWM. Too little, causing the MPPT tracking stuck in lower power, no idea why. Too large, not good for the speed of MPPT tracking. Plugging in and out battery meanwhile the sun is full shining was also tested (to make sure the code handles overvoltage, etc etc).

If I have more time, I would code using Arduino PWM in-built feature next time. I've just found out (after all of this), that I can change the PWM frequency. Heck, the more I spend time on this project, the more things I find can be improved.

What testings did I do? In brief:

Accuracy of MPPT tracking:
Very well, thank you very much. I did this by temporarily breaking the connection and reconnect the solar panel with another DC-DC converter. I noted down the power consumption of the input in-line power meter, immediately prior the converter becomes unstable, and compare this against my Arduino-Uno Boost MPPT charger input power consumption. Very close indeed. I should be honest, the test wasn't very scientific, as I only tested 2 points, i.e. at 30W and at 55W.

Efficiency of the charger:
as noted before, at least 87%. But, this is only true for power consumption above 17-ish Watt. Below this, the efficiency drops significantly (due to various reasons beyond the scope of today's blog :) ). At 3W, it's only 40% efficient. Note though, I need to repeat this efficiency test to get more accurate results. As the input power figure does jump around +/-1W due to the Perturb and Observe algorithm. I need to slow down the MPPT tracking to get the efficiency figure correctly. Why jumping around that much? Well, see next point.

Resolution of the MPPT tracking:
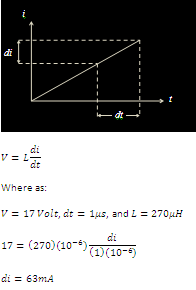
In theory, at 17V input, with 270uH, and 1us resolution of the 'onTime', I only can increase or decrease panel current by 63mA at a time (+/- 1W at 17V). Calculation as follow:


As stated in previous point, in practice, the input power does jump around +/- 1W at 17-ish panel voltage. Nice to see practice and theory agrees with each other.

Thursday, 1 May 2014

Mengisi Batere Sepeda Listrik dengan Tenaga Surya

Setelah tes lebih lanjut, sepeda listrik sang penulis sekarang bisa langsung di-isi dari panel surya, dengan rangkaian penjejak titik daya maksimum (atau MPPT ingglisnya). Spesifikasi:

Panel surya: 12V 80W (20.7V tegangan tanpa beban)
Pengisi batere: bikinan sang penulis sendiri (lihat artikel sebelumnya)
Batere sepeda: 36V 11.6Ah Lithium (NMC dari Panasonic)
Sepeda listrik: Hasil konversi.

Dengan rangkaian penjejak titik daya maksimum, sang penulis sekarang bisa lega karena tenaga panel surya diperes semaksimal mungkin. Sayang dong, kalau tenaga listrik yang dihasilkan tak terpakai secara maksimum?

Alhasil:


Rangkaian pengisi batere bisa menaikkan tegangan panel surya yang lebih rendah dibanding tegangan beban (batere).

Setelah coba-coba, ternyata kalau panel surya diposisikan ke arah matahari, bedanya lumayan banyak. Contoh, jam 9 pagi, surya panel diposisikan menghadap langsung ke matahari, dayanya naik ke sekitar 60 Watt, dibanding 35 Watt kalau menghadap ke atas (posisi matahari siang bolong). Ya, masalahnya, siapa yang sempet merubah panel surya seharian?

Thursday, 17 April 2014

Rangkaian Penjejak Titik Daya Maksimum

Rangkaian berikut dipakai untuk nge-boost voltase panel surya, lalu digunakan untuk mengisi baterai. Contoh, menggunakan surya panel 12V untuk mengisi baterai 36V yang biasa digunakan untuk sepeda listrik:

Arduino Uno digunakan untuk mengendalikan rangkaian di atas. Kodenya dapat ditemukan di sini.

Rangkaian di atas sudah di-tes di lapangan dan dapat menjejak panel surya sampai 25Watt. Seharusnya dapat digunakan sampai 75W (panel surya 12V), tapi belum di-tes berhubung awan tebal ketika tes :) . Efisiensi lebih dari 87%.

Berhubung semuanya dikontrol oleh Arduino, rangkaian di atas bisa jadi super fleksibel. Contoh, ketika batere sudah penuh, kode yang di link di atas secara otomatis menghentikan pegisian batere, ke mode 'trickle charge'.